
Ausangate Photography Guide: Lakes, Light & Night Skies
A mountain reflected in still water at dawn. A shaft of light crossing a high valley. Later, a faint cone of zodiacal light appearing above the horizon as the stars emerge.
Photo tours peru
11/17/20269 min read
Ausangate Photography Guide: Glacial Lakes, Mountain Light and Night Skies
A mountain reflected in still water at dawn. A shaft of light crossing a high valley. Later, a faint cone of zodiacal light appearing above the horizon as the stars emerge.
Ausangate photography offers more than a single viewpoint. The region invites photographers to work with changing weather, glacial lakes, mountain detail, and night skies—often from the same carefully chosen base.
The strongest itinerary gives these subjects enough time. It also accounts for walking, high elevation, local access, and the fact that a beautiful daytime location may not align with your intended night photograph.
This guide explains how to plan an Ausangate photography journey, from lake compositions and mountain light to Milky Way and zodiacal-light photography.
Why choose Ausangate for photography?
Ausangate lies in the Cordillera Vilcanota in the Cusco region. Its surrounding landscapes offer opportunities to combine mountain scenery, highland lakes, and Andean life within a photography-focused itinerary.
The appeal is variety across the day. A wide landscape can become a study of shadow and texture when the light changes. A lake can offer reflections, shoreline patterns, or an environmental composition showing the scale of the mountains.
After dark, suitable locations can provide opportunities for nightscapes. However, remoteness does not guarantee clear skies or establish a particular darkness rating. Plan your foreground, astronomy, and access together.
What can you photograph around Ausangate?
SubjectPhotographic approachWhat to planGlacial lakesReflections, shorelines, color, and wider mountain compositionsWind, light direction, and lake accessPeaks and ridgelinesBroad landscapes or telephoto detailsTerrain shadows and changing cloudHighland valleysLayers, scale, and environmental storiesWalking time and permitted routesCommunity lifeRespectful portraits and daily activitiesPermission and local availabilityMilky WayA planned relationship between sky and foregroundCore visibility, Moon, and mountain horizonZodiacal lightA faint cone of light along the eclipticA dark sky and suitable eastern or western opening
Your final route determines which subjects are practical. A short Seven Lakes excursion and a multi-day expedition are different experiences.
Glacial-lake photography near Pacchanta
Pacchanta is an established access area for visiting lakes beneath Ausangate. Official tourism records identify lakes including Anqas Qocha and Hatun Puk’a Qocha in the community’s surrounding highland landscape.
Photograph reflections when conditions allow
Calm water can create strong reflections, but wind determines what is possible.
Start with a clean separation between the mountain and its reflection. Check the frame for distracting shoreline objects, and look for a balance between the reflected subject and the foreground.
If the water is rippled, change your approach. Shoreline curves, textures, or a smaller reflection in a sheltered area may work better than waiting indefinitely for perfect stillness.
Work with color honestly
A lake’s appearance changes with viewing angle, light, weather, and surface conditions. Do not expect the same color seen in a photograph made on another day.
A polarizing filter can reduce reflections or alter the appearance of the water. Rotate it while evaluating the whole composition; maximum polarization is not automatically the best result.
Protect the shoreline
Stay on permitted ground and avoid trampling wetland vegetation. A different camera height may improve the photograph without requiring you to move into sensitive areas.
Mountain light: sunrise, daylight, sunset, and blue hour
The most useful light depends on the scene rather than the clock alone.
Sunrise
First light can separate ridgelines and reveal texture. However, a location may remain in shadow because of surrounding mountains even after sunrise.
Scout the foreground and return route in advance. Leave enough time to set up without rushing.
Daylight
Do not put the camera away automatically when golden hour ends.
Cloud shadows can create depth, and brighter conditions may suit lake colors or distant mountain details. A longer lens can isolate patterns that are less effective in a wide view.
Sunset
Late light may warm a peak while the valley falls into shadow. Look for compositions that use this contrast deliberately.
Check highlights on snow and bright cloud. Exposure bracketing can help when the scene exceeds what one frame can retain, provided the subject and your processing approach suit it.
Blue hour
The period after sunset can simplify colors and create a quieter interpretation of the landscape.
A tripod becomes useful as exposures lengthen. Keep track of the agreed return time and avoid extending a session beyond the group’s plan.
Best time for Ausangate photography
For initial planning, April to October is a useful starting period because it overlaps the relatively dry season in the southern Peruvian Andes.
That is a weather pattern, not a promise. Cloud, wind, precipitation, and cold can still affect photography.
Relatively drier months
These can make trekking and outdoor sessions more straightforward. Clear skies may favor night photography, but they can also produce strong daytime contrast and cold nights.
Wetter months and transition periods
Changing clouds can create dramatic mountain scenes. Rain or snow may interrupt sessions or alter access, and dense cloud can hide the peaks entirely.
Choose dates around the photographs you want and allow flexibility where possible.
Match the weather season to your sky subjects
Milky Way visibility and zodiacal-light geometry follow astronomical patterns rather than the rainfall calendar.
For night photography, check the date, local coordinates, Moon, twilight, and terrain before committing to an alignment.
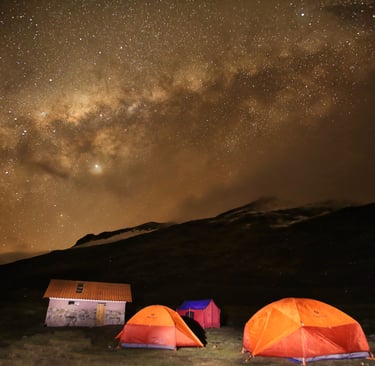
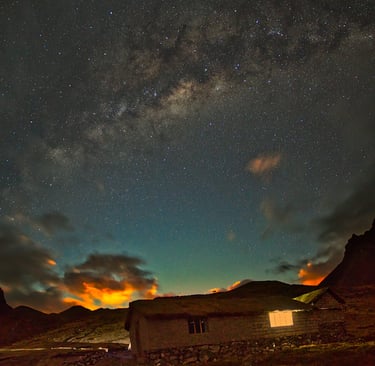
Milky Way photography at Ausangate
The bright galactic-center region is a seasonal target. A broad February-to-October Southern Hemisphere planning window is useful, but exact dark-night visibility depends on the date and the local horizon.
For many travelers, the overlap between relatively dry Andean months and useful core visibility makes May through September an attractive starting point.
Avoid choosing a camp only because it looks dark on a map. A nearby ridge may hide the core during your intended session.
Scout the scene in daylight and confirm:
The direction and height of the mountain horizon.
When the core reaches the intended position.
Moonrise, moonset, and lunar illumination.
The walking distance from camp.
A practical return route after the session.
Do not assume every lake or viewpoint can be reached or used after dark.
Zodiacal-light photography at Ausangate
What is zodiacal light?
Zodiacal light is sunlight scattered by dust between the planets. It follows the ecliptic, the apparent path of the Sun through the sky.
From a sufficiently dark location, it may appear as a broad, faint, triangular glow extending upward from the horizon.
It is different from the Milky Way, which is the band of our galaxy. It is also different from ordinary twilight or a glow produced by a town.
A photograph may record it more clearly than your eyes, but a brightened image alone is not enough to identify the phenomenon confidently.
When should you look in Peru?
A useful Southern Hemisphere starting guide is:
Season or period Where to look Planning approach Around the September equinox West, after evening twilight Plan an unobstructed western view and a Moon-free session Around the March equinox East, before morning twilight Plan an eastern opening and arrive before the sky brightens Other dates Depends on local geometry Check the ecliptic, Moon, darkness, and terrain
These are favorable planning patterns, not exclusive viewing seasons.
Ausangate is at a tropical latitude, where opportunities can extend beyond the equinox periods. Exact visibility still depends on the angle of the ecliptic, sky transparency, lunar conditions, and the height of the surrounding mountains.
Do not apply a Northern Hemisphere calendar to Peru without adjusting it.
Why September is worth considering
September can combine an evening zodiacal-light opportunity with a period that is often still relatively dry in the southern Andes.
That makes it a practical candidate for a combined landscape and night-sky itinerary. It does not guarantee a clear night or a visible cone from every camp.
What about March?
The eastern pre-dawn opportunity near the March equinox can be attractive astronomically. However, it overlaps the wetter part of the Andean year, so weather flexibility becomes especially important.
Choose the location and schedule around the actual conditions rather than booking on the equinox date alone.
The mountain horizon matters
A perfectly dark camp may still be unsuitable if a high ridge obscures the portion of the sky where the glow should appear.
For evening sessions, evaluate the western horizon. For morning sessions, evaluate the east.
A recognizable mountain silhouette can strengthen the photograph, but it must not hide the entire lower cone.
How to photograph zodiacal light
Use a wide-angle lens and a stable tripod. Begin with the same basic methods used for wide-field night photography: manual exposure, RAW capture, accurate star focus, and a test exposure.
Then evaluate the scene:
Check whether twilight is still dominating the glow.
Confirm the expected ecliptic direction.
Look for artificial light sources in the same area.
Review the full shape rather than a small bright patch.
Adjust framing to include the cone and a meaningful foreground.
Avoid forcing a color cast or increasing contrast until the image suggests a feature that was not present.
Can you photograph zodiacal light and the Milky Way together?
Sometimes, if their positions and your available field of view align.
Do not assume they will form the same arrangement seen in another photographer’s image. Use a planner for the actual coordinates and date. A panorama may be appropriate, but practice the sequence before attempting it outdoors.
The faintness of zodiacal light means moonlight, haze, and artificial light deserve particular attention.
Camera equipment for Ausangate
Choose a kit that serves your intended images without becoming too heavy for the route.
Daylight photography
A wide-angle lens helps with lakes and broad mountain scenes. A standard zoom provides flexibility, while a telephoto can isolate peaks, distant layers, or details.
A polarizer can be useful for water and reflections. Bring filters only if you know when they help and can handle them comfortably in the field.
Night photography
A wide lens with a maximum aperture around f/2.8 or wider is helpful. A sturdy tripod, self-timer or remote release, spare batteries, and a headlamp are practical essentials.
Bring lens cloths, weather protection, and enough storage for repeated exposures or panoramas.
Confirm charging arrangements before departure. Cold and long sessions can make spare power particularly valuable.
Clothing and field supplies
Bring suitable layers, gloves that allow camera operation, reliable footwear, water, and food as arranged.
Discuss camp equipment, sleeping arrangements, walking requirements, and night-session logistics before booking.
Starting camera settings
These are examples to test, not fixed prescriptions.
Subject Practical starting approach Daylight mountain landscape Base ISO when suitable, around f/8, and shutter speed matched to conditions Lake reflections Choose aperture for depth of field; adjust shutter speed to preserve or soften surface detail Blue hourTripod, manual exposure, and careful highlight review Untracked Milky Way Approximately 8–15 seconds, f/1.8–f/2.8, ISO around 1600–6400Zodiacal light Start with similar wide-field night settings, then adapt to faint glow and twilight
Exposure depends on camera, focal length, light, and final output.
Focus on a magnified bright star for night scenes, then inspect a test frame. Do not rely on the infinity mark alone.
If stars show distracting trails, shorten the exposure. If the foreground needs a different exposure, decide whether to use a silhouette, another frame, or a planned blend.
Describe composite methods honestly when presenting the final photograph.
A photography-focused day in Ausangate
The schedule should respond to conditions, but a useful structure might include:
A planned sunrise session close to a suitable base.
A flexible daylight walk with lake and mountain stops.
Time for meals, rest, backups, and equipment preparation.
A sunset or blue-hour composition.
An optional night session matched to weather and astronomy.
This is a planning model rather than a promise of five sessions every day.
A demanding walk followed by a late night and another pre-dawn start may not suit every traveler. Balance photography ambitions with the practical demands of the expedition.
Respect local communities and the landscape
Ausangate is a lived-in and culturally important Andean landscape.
Ask permission before photographing people, homes, or activities. Let your guide explain community preferences rather than treating daily life as a scene arranged for visitors.
Stay on permitted paths, avoid disturbing livestock and wildlife, and do not move rocks or damage vegetation for compositions.
Coordinate headlamps and other lights at night. Respect nearby homes and sleeping campers.
Frequently asked questions
Is the Seven Lakes route the same as the complete Ausangate trek?
No. A lake-focused excursion near Pacchanta and a multi-day route around the mountain differ in access, distance, camps, and photographic opportunities. Compare the actual itinerary.
Can beginners join an Ausangate photography trip?
Photography beginners can participate when the route matches their walking experience and needs. Learn basic camera operation first so field time can focus on light and composition.
Can I photograph zodiacal light in August or October?
Potentially. The September equinox is a useful seasonal reference, not an exclusive date. Check the actual western sky geometry, lunar conditions, weather, and local horizon.
Are clear night skies guaranteed?
No. Dark surroundings and favorable astronomy cannot remove cloud or haze.
Do I need a star tracker?
No. A camera, wide-angle lens, and tripod can produce worthwhile nightscapes. A tracker adds opportunities but also complexity and weight.
Can I photograph Rainbow Mountain on the same trip?
Selected itineraries combine the Ausangate region and Rainbow Mountain. Confirm the exact route, permitted access, camps, and timing before booking.
Plan your Ausangate photography journey with Photo Tours Peru
Tell us your travel dates, group size, camera equipment, walking preferences, and whether you prioritize lakes, mountain light, the Milky Way, or zodiacal light.
Explore our Ausangate Astrophotography Trek — 6 Days.
For a shorter combined route, explore our Ausangate and Rainbow Mountain Photography Tour — 4 Days, or discuss the Ausangate Stargazing Trek — 3 Days.
Contact Photo Tours Peru to plan an expedition around the landscape, the light, and the night-sky subjects you want to photograph.


Contact
Email: phototourperu@gmail.com
Phone: +51 940188346
© 2025. All rights reserved.
Designed by Zihna