
Huayhuash Photography Trek: Landscapes & Astrophotography
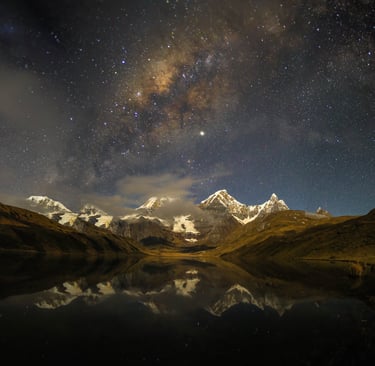
The final light reaches the mountain while the lake below falls into shadow. Hours later, the same shoreline becomes a foreground for stars.
Photo tours peru
11/17/20269 min read
Huayhuash Photography Trek: Planning for Landscapes and Astrophotography
The final light reaches the mountain while the lake below falls into shadow. Hours later, the same shoreline becomes a foreground for stars.
A Huayhuash photography trek offers the chance to explore one landscape through different kinds of light. Glacial lakes, layered peaks, mountain passes, and high camps provide subjects for daytime photography, while suitable nights can open opportunities for the Milky Way, star trails, and zodiacal light.
The challenge is fitting photography into a demanding walking itinerary. A route that looks impressive on a map does not automatically give you enough time to photograph it well.
This guide explains how to choose your route, prepare your equipment, and plan landscape and astrophotography sessions with Photo Tours Peru.
Where is the Cordillera Huayhuash?
The Cordillera Huayhuash lies in the Peruvian Andes across parts of Áncash, Huánuco, and Lima. Huaraz is a common organizing base, although the road journey and trailhead depend on the selected route.
It is a different mountain range from the Cordillera Blanca. Compare the actual itinerary rather than assuming every trek promoted from Huaraz visits the same landscapes.
For photographers, the important details are the camps, the walking stages between them, and the time available near your priority locations.
What makes a Huayhuash photography trek different?
Photography needs more than occasional stops during a walk.
A landscape session may require waiting for cloud to move, returning to a shoreline, or using a tripod before other travelers would normally start their day. Night photography adds another layer of planning.
Look for an itinerary that explains how photography fits around:
Daily walking distances and elevation changes.
Camp locations and access arrangements.
Sunrise and sunset opportunities.
Meals, rest, and equipment preparation.
Optional night sessions.
Weather-related adjustments.
Ask whether a productive camp can be used for more than one night. A repeat session may be more valuable than another destination reached just before departure.
Huayhuash photography locations to consider
SettingPhotographic possibilitiesWhat to confirmLaguna CarhuacochaMountain reflections, shoreline compositions, and nightscape foregroundsCamp location and time availableLaguna JahuacochaLake-and-peak compositions and changing lightAccess, route, and intended overnightLaguna VicongaLake scenery and broader highland landscapesWhether the selected itinerary includes itPasses and elevated viewpointsPanoramas and layered mountain viewsWalking demands and weatherCamp surroundingsClose details, silhouettes, blue hour, and night skiesPermitted areas and practical return routes
Not every eight- or nine-day itinerary visits all these places in the same order.
Laguna Carhuacocha: make time to revisit a composition
Carhuacocha is a useful location to discuss when comparing photography routes. Photo Tours Peru’s published eight-day itinerary includes a dedicated photography day in the area, subject to final arrangements.
That extra time can help you explore more than one interpretation of the landscape.
Begin with a broad composition, then look for simpler images: shoreline patterns, a reflection isolated from the rest of the scene, or a peak emerging between clouds.
Do not build the entire session around mirror-like water. Wind may make reflections impossible while creating texture that suits a different photograph.
Laguna Jahuacocha: balance the lake and the mountains
Jahuacocha is another established Huayhuash landscape setting.
Think about the role of the lake in your frame. It might serve as a reflection, a band of color, or an open space balancing the mountains.
Check edges carefully. A slightly different camera height can separate a foreground from a distant ridge without requiring you to enter fragile vegetation or approach unstable ground.
Laguna Viconga: evaluate the full itinerary
Photo Tours Peru’s nine-day photography trek includes the Viconga area within its published route.
When comparing this option with another itinerary, assess the entire day rather than the name of the lake alone. Ask how long the approach takes, when camp is normally reached, and whether the following morning allows a photography session.
An additional location is valuable when you have usable time and energy to photograph it.
Mountain passes and viewpoints
Elevated viewpoints can create strong panoramas, but they may involve longer walking stages.
Keep your setup efficient. A camera and lens within easy reach can help you respond to a brief change in light without unpacking your entire bag.
Do not plan a prolonged tripod session on a pass without discussing the route and conditions with the trekking team.
Best time for a Huayhuash photography trek
Peru’s official tourism inventory identifies April to November as a recommended visiting period for Huayhuash.
This is a practical starting window for planning, not a clear-sky guarantee. Mountain weather can change within a day, and rain, snow, wind, or cloud can affect photography.
Drier-season opportunities
Relatively drier conditions can simplify trekking and camp routines. However, clear weather can also produce hard daytime contrast and cold nights.
Work with the actual scene rather than expecting every sunrise or sunset to produce dramatic color.
Transition months
Dates outside the main window may offer changing weather and quieter conditions, but route suitability and access require specific discussion.
For a first photography trek, choose your dates around both the route and your ability to adapt to mountain conditions.
Photographing mountain light
Sunrise
A nearby mountain may block direct light long after sunrise. Plan the angle of light on the peaks as well as the time shown in an app.
Prepare equipment the evening before and agree on the morning plan with your guide.
Daylight
Use passing cloud, patterns of shadow, and longer focal lengths. A distant detail may be more effective than a wide scene under flat light.
Sunset and blue hour
As the valley darkens, bright snow and clouds can exceed the exposure range of a single frame.
Review highlights and consider bracketing when appropriate. After sunset, a tripod can help you work with the quieter colors of blue hour.
Keep the return route and scheduled departure in mind.
Planning Milky Way photography in Huayhuash
The bright galactic center has a seasonal dark-night viewing window. A broad Southern Hemisphere planning season of roughly February to October is useful, but exact hours depend on location and date.
For a Huayhuash trek, April through November often provides a practical overlap between the recommended trekking season and useful core visibility.
The local mountain horizon is essential. The core may be above the astronomical horizon but hidden behind a ridge.
Before booking around a specific image, check:
The intended camp coordinates.
End of evening twilight or start of morning twilight.
Galactic-center position during darkness.
Moonrise, moonset, and lunar illumination.
Terrain that blocks the view.
Walking distance between camp and the shooting position.
A remote camp can still have lights from other groups. Agree on considerate lighting practices rather than assuming complete darkness.
Zodiacal-light photography in Huayhuash
What is zodiacal light?
Zodiacal light is sunlight scattered by interplanetary dust. It follows the ecliptic and can appear as a faint, broad cone extending above the horizon.
It is not the Milky Way or ordinary twilight. Accurate identification depends on its shape, position, and timing, as well as ruling out artificial light.
When and where should you look?
For Peru, a useful Southern Hemisphere planning pattern is:
Period Direction and timingTrek-planning implication Around the September equinox West after evening twilight Choose a camp with a suitable western opening Around the March equinox East before morning twilight Check wet-season suitability and an eastern opening Other dates Depends on local geometry Assess the ecliptic, Moon, twilight, and terrain
These periods are favorable references, not exclusive visibility seasons.
Huayhuash is at a tropical latitude, where opportunities can extend beyond the equinox months. The actual result depends on sky transparency, moonlight, and the shape of the mountain horizon.
Why September may be a useful option
September can combine an evening zodiacal-light opportunity with the latter part of the commonly recommended Huayhuash trekking season.
That makes it worth considering for photographers prioritizing this subject. However, a September departure alone does not guarantee that the glow will be visible from every camp.
Ask for the route to be assessed against the intended sky session.
Why March needs a different decision
Around March, the eastern pre-dawn geometry can be favorable, but it overlaps the wetter part of the Andean year.
Do not select a demanding mountain trek on astronomy alone. Route conditions and operational suitability need to be assessed separately.
Choose the camp before choosing the composition
An attractive lake may face the wrong direction for your zodiacal-light image.
For an evening session, inspect the western opening. A high ridge can hide the lower part of the cone. A morning session requires the same evaluation to the east.
A low mountain silhouette can strengthen the photograph; a completely obstructed horizon may prevent the planned image.
How to photograph zodiacal light
Use a stable tripod, wide-angle lens, manual exposure, RAW capture, and accurate focus on stars.
Begin with a test exposure and inspect the broad scene. Wait for twilight to fade sufficiently, check the expected ecliptic direction, and identify any competing light sources.
Do not create a cone through aggressive processing or identify every bright area near the horizon as zodiacal light.
Can it be combined with the Milky Way?
Sometimes. The date, camp location, sky orientation, and field of view determine whether the subjects form a useful composition.
A panorama may help, but it adds time and processing demands. Practice before the trek and describe any blending or composite methods honestly.
Choosing an eight- or nine-day photography itinerary
Compare the days rather than assuming a longer program is automatically more photographic.
Question Why it matters Which camps are included?They determine foregrounds and horizons Are there repeat nights?They can provide a second chance at a scene How long are the walking stages?They affect arrival time and energy Where does Viconga fit?It changes the route rather than simply adding a stopHow are nights planned?Late sessions must fit the next day What happens in poor weather?Flexibility affects the photographic experience
Photo Tours Peru publishes eight-day and nine-day photography treks. Confirm the final camps, guiding, access, and walking requirements when selecting a program.
Preparing for a high-altitude photography trek
Plan time before the trek for a suitable arrival and preparation schedule. Discuss previous mountain experience, walking preferences, and concerns with your operator.
Camera weight changes how a walking day feels. Pack for the whole route rather than for an isolated viewpoint.
Ask which items are transported by the support team and which you carry while walking. Keep your camera, essential clothing, water, and other agreed day items accessible.
Confirm communications, contingency arrangements, and support before departure.
Camera equipment: bring a manageable kit
Landscape photography
A wide-angle lens suits lakes and broad mountain scenes. A standard zoom is versatile, while a telephoto can isolate layers and distant details.
Choose the combination you are comfortable carrying. Multiple overlapping lenses may add weight without improving the images you make.
Astrophotography
A wide lens with a maximum aperture around f/2.8 or wider is useful. Bring a sturdy tripod, remote release or self-timer, spare batteries, memory cards, and a headlamp.
A tracker is optional. It can extend sky exposures but adds weight and requires separate handling of the stationary foreground.
Filters, power, and storage
A polarizer can alter reflections and water appearance; use it deliberately. Carry weather protection and lens cloths.
Confirm charging arrangements rather than relying on unspecified camp power. Plan enough storage and a backup method for repeated exposures and panoramas.
Camera settings for landscapes and night skies
Use these as starting suggestions.
Subject Starting approach Daylight landscape Low ISO when appropriate, around f/8, shutter matched to conditions Water reflections Choose shutter speed for the surface effect you want Blue hourTripod and manual exposure with highlight review Untracked Milky Way Approximately 8–15 seconds, f/1.8–f/2.8, ISO around 1600–6400Zodiacal light Similar initial wide-field settings, adjusted for faint glow and twilight
Inspect test images. Sensor resolution, focal length, sky position, and final output affect acceptable star movement.
Focus on a magnified star rather than trusting the infinity mark alone. Recheck when you move the camera or change the lens.
For a dark foreground, decide whether to use a silhouette, a separate exposure, or a planned blend. Avoid making every part of a night scene equally bright if that removes the sense of darkness.
Balance night photography with trekking and rest
A clear sky does not mean every night should become an all-night session.
Discuss priorities with the group. A short, focused zodiacal-light session after twilight may be more practical than several hours outdoors before a demanding walking day.
On another night, a longer Milky Way sequence may be appropriate if the following schedule allows it.
A successful photography expedition includes time to eat, rest, review images, and prepare equipment.
Respect communities and mountain environments
Huayhuash routes cross landscapes managed and used by local communities. Confirm current guiding, camp access, route requirements, and community payments through your operator.
Stay within agreed areas. Do not assume any lake shore can be used as a campsite or night viewpoint.
Avoid trampling wetlands, disturbing wildlife, or moving rocks for compositions. Ask permission before photographing people or homes.
Use lights considerately and leave each camp clean.
Frequently asked questions
Is Huayhuash suitable for beginner photographers?
Photography beginners can participate when the trekking demands match their experience and preparation. Learn basic camera operation before the trip.
Is Huayhuash a photography trip for non-hikers?
It is a demanding trekking destination. Discuss walking capacity and route expectations before choosing it; photography interest alone does not determine suitability.
Are Milky Way photographs guaranteed?
No. The Moon, clouds, terrain, and conditions determine what is possible.
Can I photograph zodiacal light in August or October?
Potentially. The September equinox is a useful reference rather than an exclusive date. Check local geometry and the operational suitability of your itinerary.
Do I need a full-frame camera?
No. Suitable lenses, technique, focus, and stable support matter across different camera formats.
Does every trek visit Carhuacocha, Jahuacocha, and Viconga?
No. Route variations and itinerary length affect the locations included. Compare the actual day-by-day program.
Plan your Huayhuash photography trek with Photo Tours Peru
Tell us your dates, group size, camera equipment, trekking experience, and whether you prioritize lake reflections, mountain light, the Milky Way, or zodiacal light.
Explore our Huayhuash Landscape and Astrophotography Trek — 8 Days and Huayhuash Photography Trek — 9 Days.
Contact Photo Tours Peru to discuss an itinerary that gives both the mountains and your photography enough time.



Contact
Email: phototourperu@gmail.com
Phone: +51 940188346
© 2025. All rights reserved.
Designed by Zihna