
Manu Road Tanager Photography Guide | Photo Tours Peru
A flash of green appears among moss-covered branches. A red belly catches the light, then disappears behind a leaf. Farther down the valley, a bird lands near a fruiting tree and gives you only a few seconds to compose.
Photo tours peru
11/17/20268 min read
Photographing Peru’s Colorful Tanagers: A Guide to Manu Road
A flash of green appears among moss-covered branches. A red belly catches the light, then disappears behind a leaf. Farther down the valley, a bird lands near a fruiting tree and gives you only a few seconds to compose.
Photographing Peru’s colorful tanagers requires observation, quick decisions, and enough time in the right habitat. Manu Road offers a rewarding setting for this work, connecting high-elevation forest with warmer habitats on the eastern slopes of the Andes.
For photographers, the attraction is more than color. Changing elevations create different opportunities to photograph birds in their surroundings, while selected gardens and lodge grounds can provide time to practice portraits and behavior.
This guide explains where to concentrate your tanager photography on Manu Road, what conditions to expect, and how to plan your journey with Photo Tours Peru.
Why photograph tanagers on Manu Road?
Manu Road descends from the Cusco highlands through cloud forest toward the Kosñipata Valley and lower tropical habitats. The changing vegetation makes location choice important: birds associated with upper forest are not necessarily the same subjects you will encounter farther down the route.
A photography itinerary can combine forest walks, carefully selected roadside stops, and visits to established viewing areas.
The goal should be a varied collection of images: close portraits, feeding behavior, interactions, and wider compositions showing the forest.
Choose your route around the time available for photography, rather than the largest number of stops. Another session at a productive location may give you a better photograph than reaching an additional site late in the day.
Which tanagers can you photograph along the route?
Examples associated with the wider route and its habitats include the following.
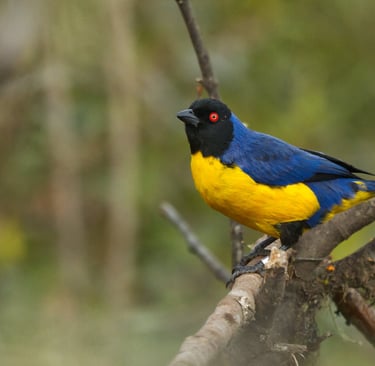
Species Location or habitat to discuss Photographic consideration Grass-green TanagerUpper cloud forest, including Wayqecha Separate green plumage from green vegetationGolden-collared Tanager Upper cloud-forest habitats around Wayqecha Watch for a clear head angle and unobstructed collar Scarlet-bellied Mountain-TanagerUpper forest in the Wayqecha area Preserve detail in contrasting dark and bright plumage Orange-eared TanagerSuitable cloud forest along the routeBe ready for brief views through foliageParadise TanagerSuitable lower-elevation forest in the wider Manu regionConfirm the route reaches appropriate habitat
This is a set of potential subjects, not a list of guaranteed sightings or feeder visitors. Species vary with elevation, habitat, access, and local activity. Not every Manu Road trip includes the same areas.
Where to photograph tanagers on Manu Road
Wayqecha: upper cloud forest and mountain birds
Wayqecha Cloud Forest Biological Station lies near 3,000 metres in the Kosñipata Valley. Amazon Conservation highlights its cloud forest and tanager flocks, including Grass-green and Golden-collared Tanagers.
For photography, the setting offers opportunities to show birds among moss, branches, and layered vegetation.
Look for an opening through which a bird can be photographed without approaching it. If the view remains partly obscured, consider whether a wider environmental composition is more effective than a heavily cropped portrait.
Mist can soften the setting, but dense fog reduces contrast. Work with nearby subjects rather than expecting sharp detail through a long stretch of fog.
Manu Tanager Garden: a dedicated photography stop
Photo Tours Peru’s published 13-day Andes and Manu Road expedition includes a planned visit to Manu Tanager Garden for colorful tanagers and other forest birds.
A garden session can provide time to understand the light and observe repeated visits. However, current activity and access should be confirmed when your trip is organized.
Before raising the camera, identify backgrounds and natural resting branches. A bird briefly pausing near a feeding area may provide a cleaner composition than one surrounded by food or other birds.
San Pedro and the Cock-of-the-Rock Lodge area
The middle section of the descent adds another forest setting. Photo Tours Peru’s itinerary identifies Cock-of-the-Rock Lodge gardens and feeding areas as potential locations for tanagers and other fruit-eating birds.
Treat this as a broader forest photography session rather than concentrating exclusively on one species.
Use your guide’s observations to select productive areas. Remain ready when birds appear, but take opportunities to review exposure and adjust your position during quieter periods.
Lower Manu Road and the Pillcopata area
Selected lower-route stops in Photo Tours Peru itineraries include Manu Endemic Lodge, Bambu Lodge, and Pico de Hoz Mirador. Opportunities depend on confirmed access and current bird activity.
This part of the journey can add variety, but travel time matters. Avoid filling a day with so many stops that each photography session becomes brief.
Ask which sites best match your target birds and whether a repeat visit can fit the schedule.
Forest trails, fruiting trees, and safe roadside stops
Photography is not limited to established gardens. Watch for birds using fruiting vegetation or moving through the forest.
A useful position may overlook a small opening or natural perch. Wait there rather than repeatedly pushing closer through vegetation.
Use only safe roadside stopping places. Do not obstruct traffic, set up on blind bends, or leave an established route for a photograph.
Photographing moving flocks
When several birds appear together, it is easy to lose time switching between subjects.
Begin with the clearest opportunity. Photograph one bird well before moving to another.
A practical sequence is:
Find a bird with an unobstructed eye.
Acquire focus and check exposure.
Capture a short sequence.
Follow only while the position remains safe and permitted.
Pause and reassess when the birds move out of view.
Your guide can help identify birds and interpret movement. Avoid trying to photograph every individual in a fast encounter.
Best time for tanager photography on Manu Road
PROMPERÚ recommends May to November for Manu Road travel. This is a useful planning window, but cloud forest can remain wet and misty during relatively drier months.
There is no universal month when every tanager species becomes easiest to photograph. Habitat, fruiting conditions, recent local activity, and the time you spend at each site all matter.
Drier conditions
Relatively drier weather can simplify road travel and outdoor sessions. However, direct sunlight can create harsh contrast between shaded birds and bright leaves.
A partly shaded location with a manageable background may be more useful than a brightly lit perch.
Wetter conditions
Overcast skies can provide soft light, and wet vegetation can contribute atmosphere. Heavy rain interrupts sessions and can affect road access.
Build flexibility into the itinerary, protect your equipment, and let conditions guide the day’s locations.
Is early morning always best?
Early sessions are worth planning, but a forest location may be extremely dark at dawn. Later light can improve shutter-speed options.
Choose timing around bird activity and the actual viewing position, rather than relying on a fixed rule.
Camera equipment for tanager photography
A familiar camera and a manageable telephoto lens are a useful foundation.
A zoom gives flexibility when birds appear at different distances. Longer lenses help with small subjects, but weight and minimum focusing distance matter on trails and at close viewing areas.
Bring:
Spare batteries and memory cards.
Rain protection and clean lens cloths.
A reliable backup system.
Suitable support for your lens and photography style.
Comfortable footwear for damp, uneven ground.
A shorter lens for forest scenes and environmental photographs.
Check charging arrangements before departure. A remote lodge may not offer the same facilities as a city hotel.
Camera settings for tanagers in cloud forest
Treat the following as starting suggestions to test.
Situation Starting approach A still bird on a perchTry around 1/500 second and review sharpness An active bird feeding or hopping Increase toward 1/1000–1/1600 second A short flight or rapid movement Test around 1/2000 second or faster when light permits A dim forest sceneBalance movement, aperture, and ISO instead of relying on one fixed setting
The correct shutter speed depends on movement, focal length, support, and the result you want. Stabilization helps with camera shake but does not freeze a moving bird.
Use continuous autofocus for movement
Continuous autofocus is useful when birds change position. Bird-eye detection can help when available, but foliage may confuse it.
Know how to switch to a smaller focus area when the camera repeatedly selects leaves or branches.
Let ISO support the shutter speed
If motion blur is the problem, a higher ISO may be preferable to a slower shutter. Auto ISO can help maintain your chosen exposure approach as conditions change.
Review important images at magnification. A technically clean file is of little value if the eye is blurred.
Balance aperture and depth of field
A wide aperture helps in low light, but shallow depth of field can leave parts of the bird soft.
When conditions allow, stop down enough to retain the detail you want across the head and body. Check the actual image rather than choosing an aperture only for background blur.
How to preserve the colors of tanagers
Vivid plumage deserves careful exposure and restrained processing.
Check bright feathers
A bird moving into a patch of sun can change the exposure requirements immediately. Review highlights, particularly when bright plumage contrasts with a dark background.
If your camera offers a color-channel histogram, use it to help evaluate strongly saturated areas. A channel that clips may lose detail even when the overall image does not look excessively bright.
Work with head angle and background
A small change in the bird’s angle can reveal the eye or separate the head from a branch.
When permitted, adjust your position slightly to improve the background. Do not disturb the bird or vegetation to obtain a cleaner image.
Process for believable detail
RAW files provide flexibility for exposure and white balance. Use that flexibility to retain feather texture and natural-looking color.
Avoid increasing saturation until markings become difficult to distinguish. Apply noise reduction and sharpening carefully, especially around fine feather edges.
Gardens versus forest encounters
Setting Advantage Challenge Managed gardenTime to observe recurring visits and refine compositions Feeding infrastructure and other visitors may affect images Lodge grounds Convenient photography near accommodation Activity varies Forest trail Habitat context and naturally encountered behaviorShort views and obstructing vegetation Roadside openingA potentially clearer viewing angle Traffic, safety, and limited stopping places
A balanced trip can include several settings. Ask how much time is actually reserved for photography and which locations require advance arrangements.
Responsible tanager photography
Keep normal bird behavior more important than your composition.
Stay on permitted routes, respect private property, and follow local rules on playback, lighting, and feeding.
Do not cut branches, clear vegetation, approach active nests, or handle birds for photographs. At managed feeding sites, follow the operator’s hygiene procedures and do not add food yourself.
Avoid crowding a bird or blocking its access to a feeding area. Leave space for other visitors and follow your guide’s directions.
How many days should you allow?
Choose duration according to your priorities.
A short Manu Road trip can introduce selected habitats, but transfers take a substantial share of the schedule. A longer itinerary provides more scope for different elevations, weather flexibility, and repeat sessions.
For a tanager-focused trip, ask:
Which habitats and species are priorities?
How many mornings are reserved for photography?
Can productive sites be revisited?
How much time is spent driving?
What walking distances are involved?
Which access arrangements and fees are included?
The value of an itinerary depends on usable field time, not simply its number of destinations.
Frequently asked questions
Is Manu Road suitable for beginner bird photographers?
Yes, when the itinerary matches your experience and walking preferences. Start with clear perched subjects and build confidence before attempting fast-moving forest birds.
Can I photograph Paradise Tanagers on every Manu Road tour?
No. The wider Manu region includes different habitats, and not every short itinerary reaches appropriate locations. Discuss the target species and recent local activity before booking.
Are tanagers guaranteed at photography gardens?
No. Managed viewing areas can improve opportunities, but bird visits, weather, and photographic conditions vary.
Can I combine tanager and hummingbird photography?
Yes. Selected gardens and lodge grounds can offer both. The final route should reflect your priorities and current site arrangements.
Is Manu Road the same as a trip inside Manu National Park?
No. Many photography itineraries focus on the road corridor and surrounding habitats. Visits to park river sectors require additional arrangements. Compare the actual route before booking.
Photograph Manu Road’s tanagers with Photo Tours Peru
Tell us your travel dates, target birds, group size, camera equipment, and walking preferences. We can discuss an itinerary with dedicated photography time and suitable habitat choices.
Explore:
Contact Photo Tours Peru to plan a journey around Peru’s colorful tanagers, forest habitats, and the photographs you want to create.



Contact
Email: phototourperu@gmail.com
Phone: +51 940188346
© 2025. All rights reserved.
Designed by Zihna