
Uyuni Photography Guide: Salt Flat Reflections, Landscapes and Night Skies
Uyuni photography offers several very different landscapes within one destination: shallow water reflecting the sky, white salt stretching toward distant mountains, geometric surface textures and broad horizons beneath the stars
Photo tours peru
11/17/202612 min read
Uyuni Photography Guide: Salt Flat Reflections, Landscapes and Night Skies
Uyuni photography offers several very different landscapes within one destination: shallow water reflecting the sky, white salt stretching toward distant mountains, geometric surface textures and broad horizons beneath the stars.
The Salar de Uyuni is in Bolivia. For photographers traveling with Photo Tours Peru, it can become a dedicated Bolivia expedition or an extension to a wider South American journey. Its photographic possibilities depend on the season, water coverage, wind, cloud and the time available to wait for changing conditions.
The most useful starting point is to decide what matters most: mirror reflections, dry salt patterns, night skies or a balance of all three. They do not always reach their best conditions together.
What makes Salar de Uyuni special for photography?
NASA identifies Salar de Uyuni as the world’s largest salt flat. Water can spread across parts of its surface during the rainy season, creating the reflective appearance that makes the destination famous.
Its scale also makes it a rewarding place to practice restraint. A small figure, a strip of mountain or a single cloud can organize a composition that otherwise contains very little. Light and relationships between shapes often matter more than filling the frame.
Build a varied series. Include an expansive scene, a closer study of texture, a change in weather and an image that communicates scale. Returning to one location in different light can be more productive than collecting many brief stops.
Best time to photograph Uyuni: reflections or dry landscapes?
The broad wet-season planning window is approximately December through March or April. The drier part of the year is generally a better starting point for exposed salt textures and more extensive travel on the salar, subject to local conditions.
Rainfall does not arrive or disappear on a fixed date. Water coverage can differ across the salt flat, and conditions from a previous season cannot guarantee the same result during your visit.
Priority Planning approach Main compromise Mirror reflections Favor the wet-season window and allow repeat sessions Cloud, wind and flooding may limit photography or accessDry salt geometry Favor the drier months and confirm surface conditions Broad mirror areas may be absent Milky Way coreChoose a suitable season, darkness interval and core position Clear skies and access remain uncertain Reflected stars Seek accessible calm water during a clear, suitably dark interval Several conditions must align at once Mixed landscape portfolio Allow several days and adaptable routes No single trip guarantees every subject
For a reflection-focused trip, ask about recent water conditions before departure. For astrophotography, ask which hours provide both a useful sky and a safe shooting location. A trip can take place during new moon and still be unsuitable for a particular Milky Way composition.
How Uyuni’s mirror effect works
A shallow layer of water can reflect clouds, mountains and the changing colors of the sky. Smooth water is essential for a crisp reflection; wind creates ripples that break the image.
More rainfall does not automatically produce better photography. Deep or extensive flooding can make routes unsuitable, while water may be concentrated in places that do not match your preferred background.
Work with an experienced local driver who understands current routes. Never request access to an unsafe flooded area merely because a photograph appears possible from a distance.
Compose around symmetry
Place the horizon near the middle when you want a deliberate mirror composition. Check that it is level: a small tilt becomes obvious in a simple frame.
Alternatively, give more space to the reflection or sky when one contains the stronger shapes. A centered horizon is a choice, not a rule.
Keep vehicles, footprints and equipment out of the composition before taking your final frames. If including a person, discuss where to stand and allow the water to settle after movement.
Choose a useful camera height
Lower positions can emphasize the reflective surface, but keep the camera comfortably above water and salt spray. Higher viewpoints may help separate a person from the horizon.
Try several heights rather than assuming the lowest angle is best. Examine the edges of the frame for stray objects and awkward intersections between a subject and a distant mountain.
Use filters selectively
A polarizer can reduce the reflection you came to photograph. Rotate it while observing the effect, and remove it when it weakens the composition or creates uneven skies.
A neutral-density filter can extend exposure for a creative effect. It cannot restore a sharp mirrored cloud when wind is continually disturbing the water.
Dry-season salt flat photography
When the surface is dry, look for salt ridges, repeated shapes and subtle changes in texture. Side lighting can reveal relief that looks flat in overhead sun.
A wide lens emphasizes foreground patterns. Keep the camera level when possible and check whether extreme foreground enlargement supports the photograph. A longer lens can simplify a distant mountain or compress layers of landscape.
Try these approaches:
Place an interesting junction of salt ridges in the foreground.
Leave clean space around a small human figure to communicate scale.
Isolate a mountain and its surrounding white space with a telephoto lens.
Make a series showing how one pattern changes from warm light to twilight.
Do not damage the surface or arrange salt into artificial patterns. Work with the available landscape and follow local access instructions.
Sunrise, sunset and blue hour
Sunrise and sunset can reveal color and relief, but their appearance depends on cloud and atmospheric conditions. Arrive early enough to choose a position and remain after the strongest color fades.
For reflections, watch the entire sky rather than only the sun. Clouds in the opposite direction may provide a stronger composition. Blue hour can offer a quieter palette and a gentler transition between land and sky.
Bright salt can influence automatic metering. Use the histogram and highlight warnings to check important details rather than applying a fixed exposure correction. Bracket a static high-contrast scene when needed, keeping the camera steady.
If blending exposures, watch for moving clouds and people. A technically merged image is not necessarily a convincing representation of the scene.
Uyuni astrophotography: plan the sky before booking
A successful nightscape requires an accessible foreground, clear sky, manageable wind and enough darkness for the chosen subject.
The bright central region of the Milky Way is not available in the same position all year. Austral winter provides long opportunities to observe it, but other parts of the annual cycle can suit different compositions. Early-season core photography often requires working before dawn; later opportunities shift toward evening.
Use an astronomy planner set to the actual location and date. Check:
Sunset, twilight and the start of astronomical darkness.
The core’s rise, set, direction and altitude.
Moonrise, moonset, phase and position.
The duration of the useful shooting interval.
The foreground and a safe route agreed with the local team.
New moon is a convenient starting point, but a moonless interval on another date may work. Moonlight can also illuminate dry salt and mountains for a different kind of night landscape.
Do not infer that the entire salar has a particular Bortle rating. Local sky conditions change with nearby settlements, vehicle lights, cloud and the direction of the composition.
Photographing Milky Way reflections
Reflected stars are more demanding than daylight reflections. You need calm water and a clear view of the sky during a suitable darkness interval, with safe access to the location.
The reflection is often fainter than the sky. Preserve that relationship rather than forcing both halves to identical brightness. Wind, thin cloud and movement in the water can soften the reflection during an exposure.
Secure the tripod and avoid walking near it while shooting. A tracked exposure may record a sharper sky but blur the land and reflected scene. Plan separate frames if required and describe the method honestly when presenting a blend.
Zodiacal light photography at Uyuni
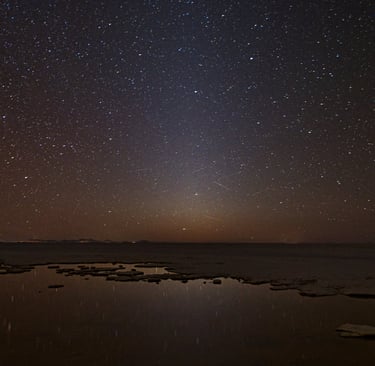
Zodiacal light is a faint, broad cone of sunlight scattered by interplanetary dust in the inner Solar System. It follows the ecliptic—the apparent path of the Sun through the sky—and can extend upward from the horizon after evening twilight or before dawn.
Unlike an aurora, it does not come from charged particles interacting with Earth’s atmosphere. Unlike the Milky Way, it is not the combined glow of distant stars in our galaxy. Its subtle appearance can add another layer to an Altiplano nightscape.
When and where to look
Uyuni is in the Southern Hemisphere. As a broad seasonal starting point, look toward the eastern horizon before dawn around the March equinox, and toward the western horizon after evening twilight around the September equinox. These are favorable planning windows rather than the only times it can be visible.
Uyuni’s relatively low southern latitude allows opportunities beyond those equinox windows. The actual angle of the ecliptic, moonlight, atmospheric clarity and local horizon determine whether a particular session is worthwhile. Check an astronomy planner for the exact location and date instead of applying Northern Hemisphere timing advice unchanged.
Session Direction Broad planning window What to check Morning zodiacal light East, along the ecliptic Around March and the southern autumn Moon below the horizon and enough time before dawn brightens Evening zodiacal light West, along the ecliptic Around September and the southern springTwilight sufficiently faded and a clear western horizon
Plan around astronomical twilight rather than a universal clock time. A new-moon trip can help, but any suitably moonless interval may be useful. Allow your eyes to adapt to darkness and keep bright screens and vehicle lights out of the viewing direction.
How to recognize zodiacal light
Look for a diffuse, tapering glow that follows the ecliptic and broadens toward the horizon. The Milky Way usually shows a more structured band with star clouds and dark lanes. Twilight brightens the horizon more broadly; artificial light can produce localized domes, while thin cloud may scatter light into misleading shapes.
Compare the glow with the expected ecliptic direction, review a sequence of frames and keep processing restrained. Do not label an unidentified bright area as zodiacal light simply because it appears in a long exposure.
Camera settings and composition
Start with a wide lens around 14–24 mm on full frame, or an equivalent field of view, a stable tripod, manual focus and RAW capture. Try approximately 5–15 seconds at f/1.8–f/2.8 and ISO 1600–6400, then adjust to your lens, camera and sky brightness. These settings are starting points; inspect star sharpness and the histogram before continuing.
Leave enough space above the horizon for the cone to develop in the composition. A portrait orientation may suit a steep cone, while a wider frame can show its relationship to the salt flat and other sky features. Avoid exposing so brightly that the naturally faint glow resembles daylight.
If stacking frames, align stars appropriately and handle any foreground separately when necessary. Strong noise reduction and aggressive contrast can remove subtle structure or create a misleading boundary around the glow.
Can zodiacal light reflect in the salt flat?
In principle, a faint reflected glow may be recorded when accessible shallow water is calm and the sky is clear and suitably dark. Treat this as an ambitious additional opportunity, not a standard tour outcome. The reflection may be much weaker than the direct glow.
The morning window around March can overlap the broad wet-season reflection period, but cloud, ripples, water coverage and access may prevent a successful photograph. Evening opportunities around September may favor a dry-salt foreground instead. Choose the subject that conditions actually support.
Tell Photo Tours Peru if zodiacal light is a priority when planning your Uyuni astrophotography tour. It requires its own viewing direction and twilight schedule, which may differ from the preferred Milky Way composition. Neither phenomenon should be promised without regard to conditions.
Camera settings for Uyuni photography
These are practical starting points, not fixed recipes.
Scene Suggested starting settings Adjust for Daylight reflectionsLow native ISO, f/8–f/11, shutter speed to match movement Wind, people and highlight detail Salt patterns near sunrise Low ISO, f/8–f/11, tripod when needed Foreground sharpness and wind Environmental portrait Around 1/250 second or faster, aperture for the intended depth Subject movement and background Untracked wide-angle stars Roughly 5–15 seconds, f/1.8–f/2.8, ISO 1600–6400Lens, sensor, sky brightness and trailing Moonlit landscapeLow to moderate ISO, exposure chosen from test frames Moon strength, cloud and desired star detail
For stars, magnify a bright star in live view and focus carefully. Inspect test images at full size. Infinity markings are not always reliable, and focus can shift as equipment cools.
The familiar 500 rule is only a rough estimate; shorter exposures may be necessary for sharp stars on modern cameras. Use an NPF calculation or direct inspection to refine your shutter speed.
Stacking several compatible frames can reduce noise. Keep processing restrained and retain natural variation in the sky and reflection.
What to bring
A dependable camera, familiar lenses and a stable tripod are more useful than an unfamiliar collection of equipment.
Bring a wide lens for nightscapes, a standard zoom for general landscapes and a telephoto if you enjoy distant details. Include spare batteries, sufficient memory, a remote release or timer, a dimmable headlamp and reliable backup storage.
Protect equipment from salt and water. Carry a weather cover, dry bags, a blower and clean cloths. Avoid placing an open camera bag on wet salt.
After exposure to salt, follow the manufacturer’s cleaning guidance. Clean tripod components appropriately, dry them thoroughly and never rinse or immerse electronics.
Warm layers, gloves that allow camera operation, sun protection and suitable footwear help you remain comfortable during long sessions. Confirm whether waterproof boots and other specialist items are provided.
Altitude, access and responsible fieldwork
Uyuni is a high-altitude destination, and broader Altiplano routes can include higher passes and overnight locations. Ask for the elevation profile and discuss a realistic acclimatization plan before traveling.
Do not assume that arriving from Cusco makes every onward schedule suitable. Flight changes, sleep, individual response and higher destinations still affect planning.
An experienced driver and suitable vehicle are central to this trip. Let current surface and weather conditions determine the route. Leave exposed areas when the local team identifies a storm risk; never continue a lightning shoot simply to complete a sequence.
Avoid disturbing wildlife, leave no litter and obtain permission before photographing identifiable people closely. Respect local communities and active workplaces around the salar.
Drone use requires separate checking of current aviation rules, protected-area restrictions and local permission. Do not assume an open landscape is unrestricted airspace.
Locations beyond the open salt flat
A wider Uyuni itinerary may include the Tunupa area, Incahuasi Island, rock formations and other highland landscapes. These are not interchangeable with the salt flat itself, and their inclusion depends on the route.
Flooding can limit travel to island locations. Longer southern Altiplano journeys introduce additional distances, elevations and accommodation considerations. Ask exactly which landscapes are included rather than assuming every Uyuni tour visits the same places.
Use these contrasts deliberately: reflective surfaces, dry texture, volcanic forms and closer environmental details can create a coherent portfolio without requiring every possible destination.
How many days should photographers allow?
A single outing gives limited scope to respond to changing weather. Several sessions allow you to revisit a foreground, wait for calmer water or move a night shoot to a clearer interval.
Choose duration by the time actually allocated to photography. A six-day itinerary may include transfers, while a longer journey may cover substantially more ground.
A productive rhythm can include arrival and orientation, daylight scouting, a sunset session, a night attempt when conditions suit, rest and a repeat visit. Avoid planning every sunrise immediately after a full night outdoors.
Uyuni photography tours with Photo Tours Peru
Choose the itinerary that matches your photographic priorities and review its current details before booking.
TourPlanning interest6-Day Uyuni Astro and Landscape Photography WorkshopDedicated landscape and night photography9-Day Uyuni Salt Flats Photography ExpeditionA broader Bolivia photographic journey11-Day Atacama and Uyuni Photography TourCombining Chilean and Bolivian landscapes13-Day Bolivia Photography Tour: Uyuni and SajamaA longer exploration of Bolivia’s mountain and salt-flat scenery
Ask about accommodation, driving time, night-session flexibility, photography guidance and seasonal alternatives. Mirror effects, Milky Way visibility and clear skies depend on conditions.
Combine Uyuni with Peru
A Peru and Bolivia photography trip can connect different landscape and cultural interests. Allow realistic transfer time and confirm border and entry arrangements for each traveler.
If you also want Peru’s festivities, plan that part around the actual celebration calendar. Candelaria, Inti Raymi and Paucartambo’s Virgen del Carmen have different timing; none is an event at Uyuni. A festival extension should have its own cultural focus and suitable time allocation.
Plan your Uyuni photography journey with Photo Tours Peru. Share your dates, experience level and priorities—reflections, dry landscapes, night skies or a combination—through Photo Tours Peru. We can discuss an itinerary with time to observe the light and adapt to local conditions.
Frequently asked questions
When is the best time for Uyuni reflections?
The wet-season window, approximately December through March or April, is the starting point. Actual results depend on accessible shallow water, wind and recent rainfall.
Can I photograph reflections and the Milky Way on the same trip?
It is possible when water, clear sky, darkness and the core’s position align. These conditions cannot be guaranteed, so allow repeat sessions.
Is dry season better for landscape photography?
It favors exposed salt textures and a different visual style. Rainy season favors reflection possibilities. Choose according to the photographs you want.
Can I photograph Uyuni with a phone?
Yes, especially in daylight. Keep the horizon level, protect the phone from saltwater and avoid excessive digital zoom. Dedicated cameras offer more control in difficult night conditions.
Do I need a star tracker?
No. A wide, fast lens and tripod can produce effective untracked nightscapes. Tracking introduces additional capture and blending decisions.
Can I photograph zodiacal light at Uyuni?
It can be possible under dark, clear conditions with a suitable horizon. Start planning with eastern pre-dawn views around March or western evening views around September, then check the exact date, ecliptic angle and Moon. Reflections require additional calm-water conditions.
Is Uyuni in Peru?
No. Salar de Uyuni is in Bolivia. Photo Tours Peru offers Bolivia photography itineraries that can be discussed as part of a broader trip.
Are mirror reflections guaranteed on a photography tour?
No. A specialist itinerary provides time, local knowledge and adaptable planning; the reflection still depends on weather and surface conditions.
Editorial sources
Armagh Observatory and Planetarium: zodiacal light and Southern Hemisphere March morning visibility — use the seasonal explanation, not historical date-specific Moon advice.
Swinburne University COSMOS: Zodiacal Light — scattering, ecliptic geometry and spring-evening/autumn-morning visibility.
NASA Earth Observatory: A Salt Bath in Bolivia — geographic context, flooding and reflections.
Bolivian official tourism publication — wet-season mirror context.
Research: water surface smoothness in Salar de Uyuni — water smoothness and seasonal rainfall.
ESO: The Milky Way above the ESO 3.6-metre telescope — galactic center visibility context.
ESO: Zodiacal Light and ESO: Eclipsed moon, striking night sky — zodiacal light and its physical cause.
The four linked Photo Tours Peru tour pages — current products; reconfirm detailed arrangements before booking.
Camera settings, composition and itinerary pacing are editorial guidance. They are not guarantees of conditions or results.


Contact
Email: phototourperu@gmail.com
Phone: +51 940188346
© 2025. All rights reserved.
Designed by Zihna